The Molongui Authorship plugin adds support for guest authors. Just like you do with your users and posts in your site, you can add as many as you need, and easily edit and remove them. You can even convert them to registered users so they can have an account in your site if they become regular contributors.
There are two ways to add new guest authors on your WordPress site:
- using the Guest Authors menu item
- directly from the edit-post screen
In this article, we will show you how to add new guest authors to your WordPress blog using the Guest Authors menu item.
To add a new guest author to your WordPress site, simply click on Guest authors > Add New and fill out the form.
You need to provide the author name, which is actually the only mandatory field. All other fields are optional.
Once you have added the guest author on your WordPress site, you can add them to any post or page. See Authoring a post to read detailed information on how to add an author to a post.
Form Fields
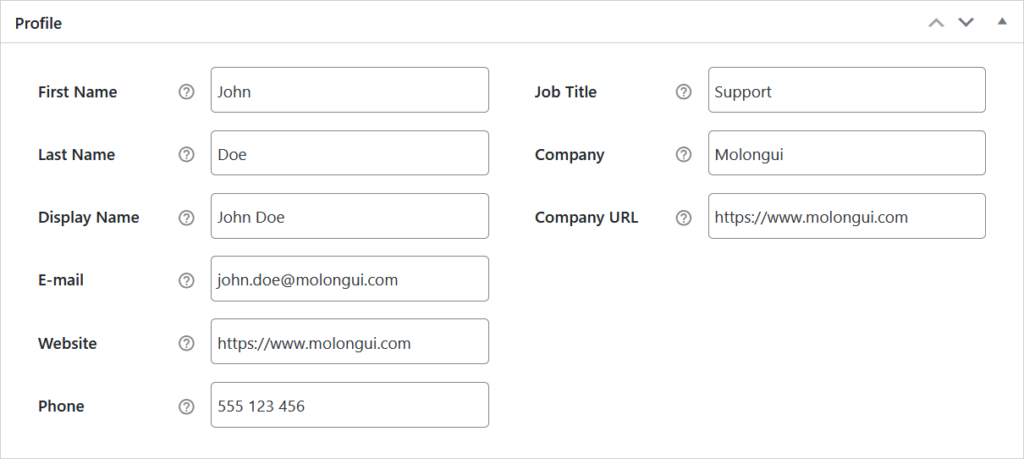
Profile Box
Here you can provide personal and professional information about the guest author.

First Name. The guest author’s first name.
Last Name. The guest author’s last name.
Display Name. The name that will be shown publicly to identify the guest author. This will appear in places like the post byline, author box and authors list.
E-mail. The guest author’s e-mail address. This can be used to retrieve author’s gravatar. It is optionally displayed in the author box.
Website. The URL to the guest author’s website. If filled in, it will be shown in the author box.
Phone. The guest author’s contact phone. It is optionally displayed in the author box.
Job Title. The guest author’s job position. It will be displayed on a text line below the author name within the author box.
Company. The name of the organization the guest author works for. It will be displayed on a text line below the author name within the author box.
Company URL. The URL to the organization’s website the guest author works for. If filled in, the company name will link to this URL.
Biography Box
Bio. The author’s full biography, description… or actually whatever text you like. You can even add any third-party shortcode if you have the Molongui Authorship Pro extension. This is the bio text that will be displayed on the author page if your theme supports it.
Short Bio. The author’s short biography that will be displayed in the author box. Third-party shortcodes are accepted when having the Molongui Authorship Pro extension.
Social Profiles
The author’s social media public profile URL’s on each social network. Only those profiles with a valid URL will be displayed on the author box.
To avoid cluttering the page, just the most popular social networks are enabled by default. You can enable those you need in the plugin settings page.
Avatar
The author’s profile picture. It can be any image you upload. If none is provided, the Molongui Authorship plugin will try to retrieve the associated Gravatar to the given e-mail address, if set.
Role
Often guest authors are not regular contributors. However, over time, they might become one, so you might want to convert them to registered users so they can have an account in your site.
Clicking on the Convert button you can easily convert a guest author to a registered WordPress user. The guest author will be removed and a new user created. Posts authorship will be kept.
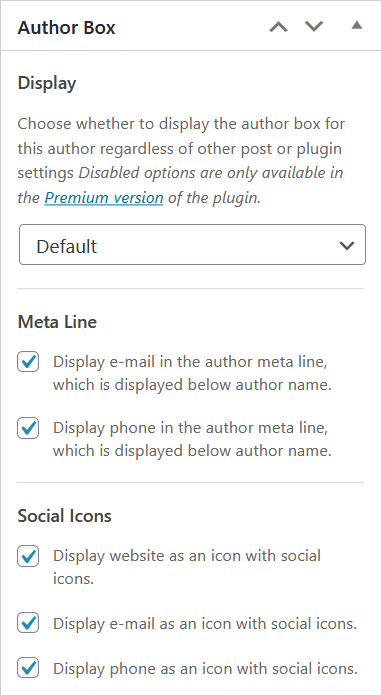
Author Box
Display. Whether to display the author box for this guest author regardless of other post or plugin settings.
Meta Line. Whether to display e-mail address and phone in the author meta line, which is displayed below author name.
Social Icons. Whether to display website, e-mail address and phone as an icon with other social icons.

